

First, to be very clear - this update is free for all current HueForge owners regardless of when they bought HueForge.
Second, the ColorDrop update is a fix to some bugs in the old version that people had run into. It is NOT the new ColorDrop 2.0. BUT this release is laying the groundwork for ColorDrop 2.0 coming next.
The small ColorSmith update just fixes some issues with Palette and Image persistence in HueForge after apply.
Spotfix is finicky. So try Match Fix instead
Instead of working on mesh triangles and tricky selection, I added the ability to fix the Color Match right after it happens. Based on the image instead of the mesh, this mode is a lot easier to control selection, especially of a lot of small points. The tradeoff is you do have to go one layer at a time for now. (I should be able to add group moves in the future).
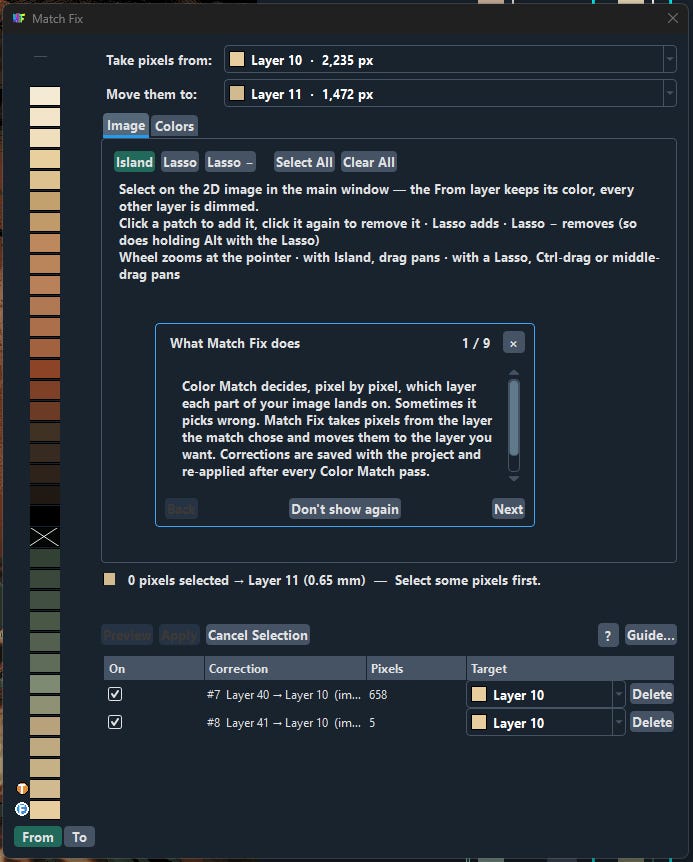
As with ColorSmith, this comes with a tutorial going through how things work. But the general idea is you pick a From layer and a To layer, then select problem regions in the image
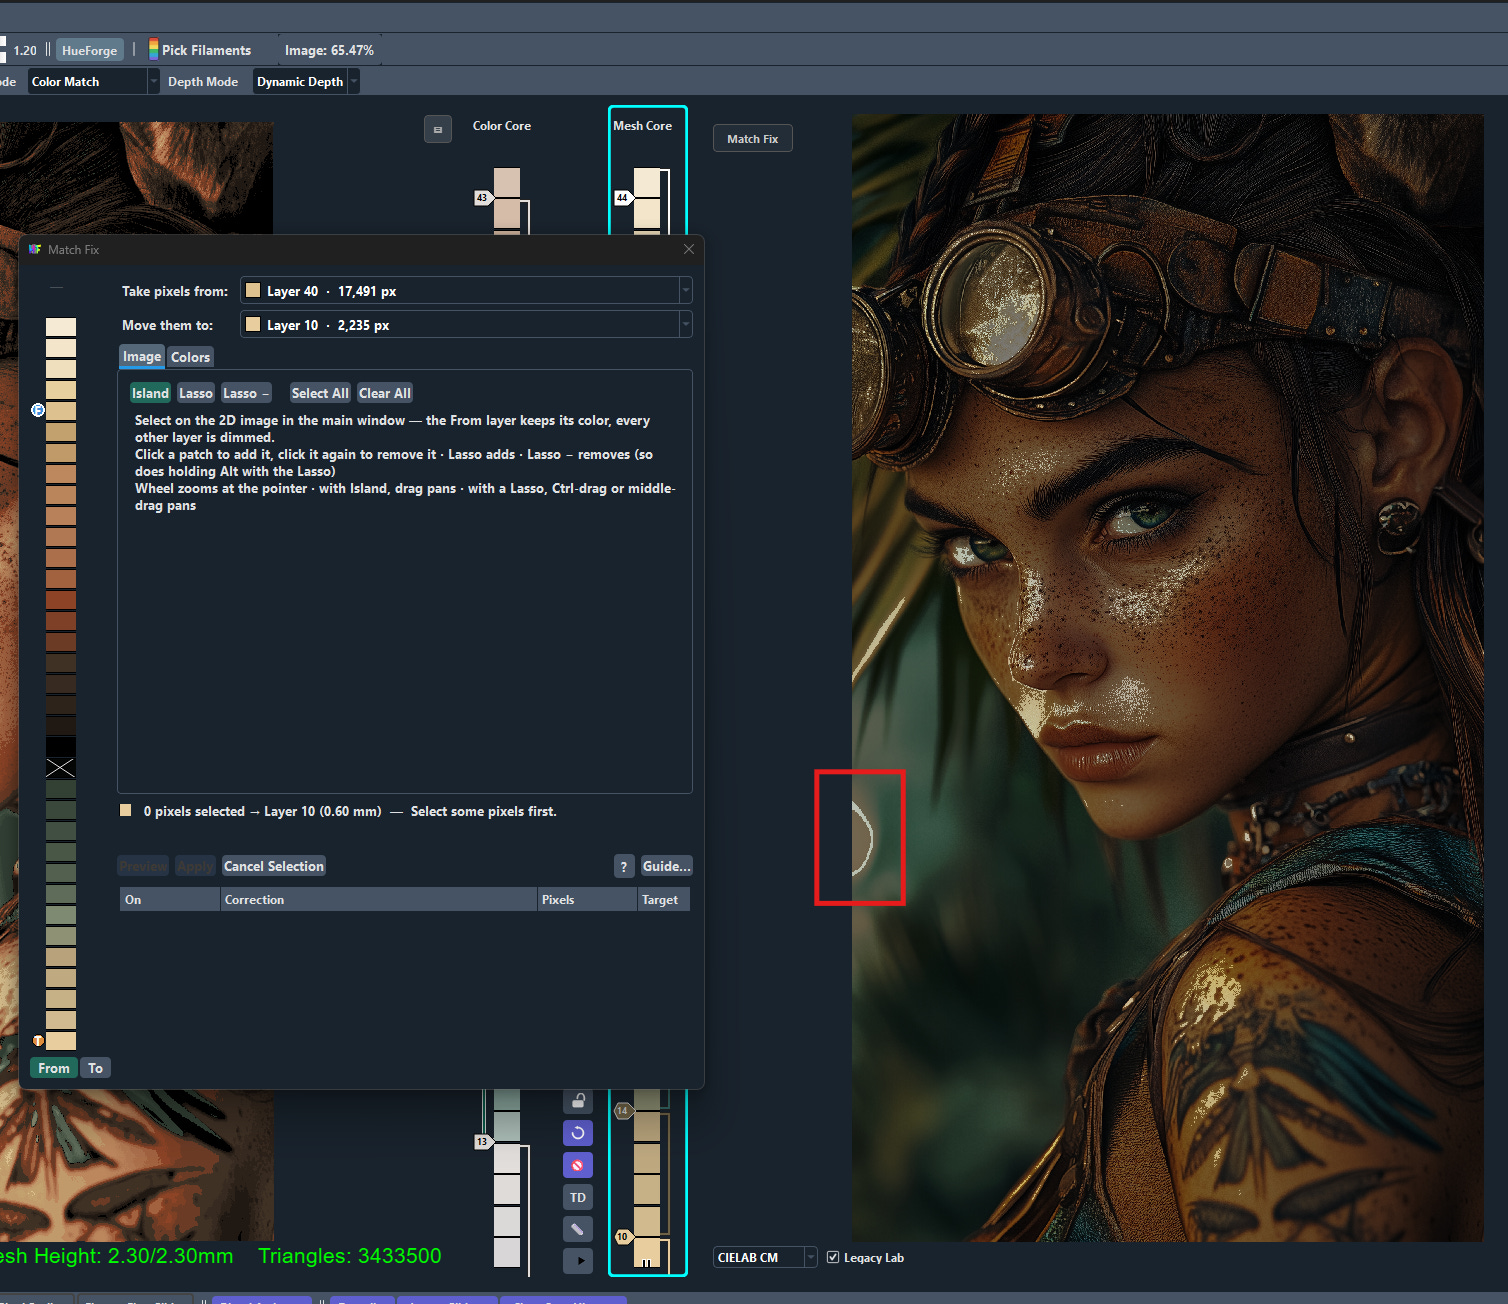
For large blobs, you can click on it when Island is selected. For clouds of points, you can draw a lasso around them - lassos at the edge smoothly clip to the edge.
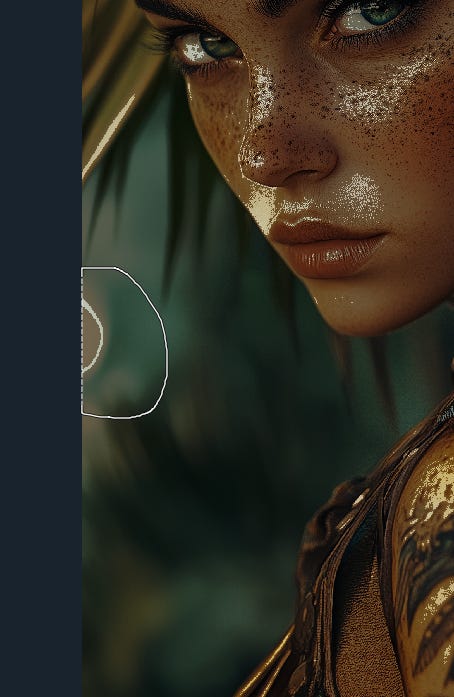
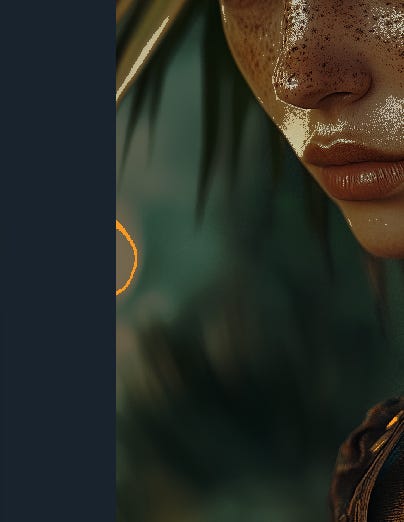
Once selected, the points show in a clear color so you can identify what was selected. Then simply set the To layer to the layer you want and Apply. (You can preview first if you want). If you don’t like the layer you put it on, you can change the To or Target layer, but the From is locked. You can add more pixels to the selection by clicking on an already existing correction, selecting more, and pressing Apply again. The changes are immediately reflected in the 3D Preview.
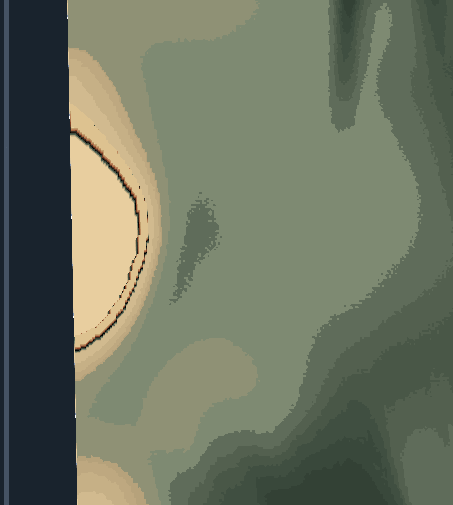
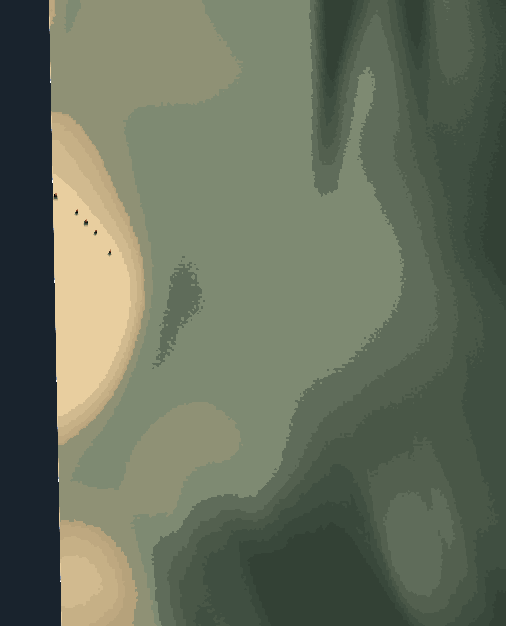
Here you can see that arc was removed but there are a bunch of little dots there. This is because a few pixels were on different layers. Simply find that layer by moving From, and then select and apply a correction to those pixels as well.
Sync Between Copies (LAN only)
There has long been a difficulty in syncing between different copies of HueForge on different computers. Making a shared configuration folder on a cloud drive is a solution, but it’s not always available or what people are comfortable with. In the new Tools menu is a Sync option. By default, Sync ships off. This is part of my promise to never activate your network without your explicit permission. When you check this box, you should expect it to request network permissions, this is normal and you should approve. It won’t send anything outside of your local network.

You can set your name to whatever you want so you know which system is which. If you are particularly security conscious or your IP Addresses are statically applied, you can turn on Strict IDs but for most people, it’s best to leave this off.
There will be a list of any running HueForge instances on your network that have Sync on you can pair with.

When you press pair, the other system will pop up a 6 digit code for you to enter and confirm. Pairing is bi-directional so both systems will be paired. That system will now show up in the right column of Paired Devices:
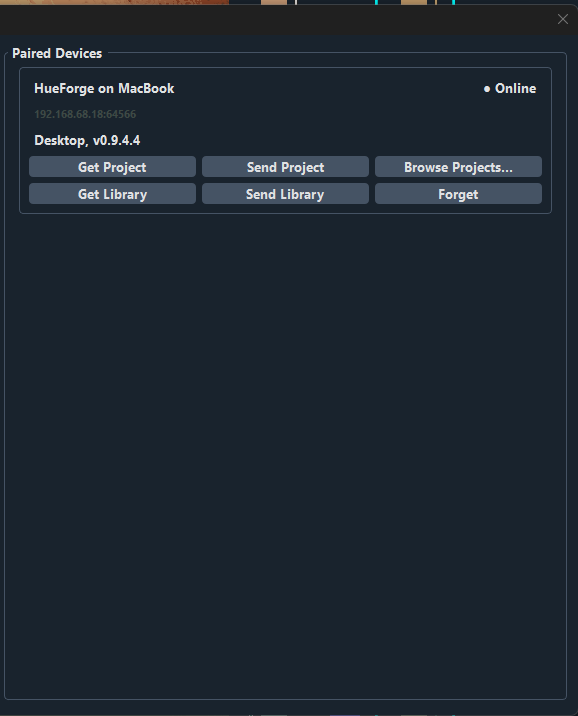
You see there are several options, most notably, this is a very easy way to share filament libraries between system including updates. You can pull or push your library (the other end will get a confirmation dialog with some options, it is not forced through without their consent)

You can also push or pull the active project on either system. If you have started working on your desktop but want to continue on your laptop, just push it to the laptop - there will be an opportunity to save any unsaved work before accepting. Nothing is saved to disk on the remote end until you save and pick a filename. This gives you full control over where to save the project.
It is also possible to share folders with Projects in them

This is a recursive search through those folders for all included projects. You can click on Browse Projects to see the shared projects on the other system (if they don’t share anything, the button won’t be there)
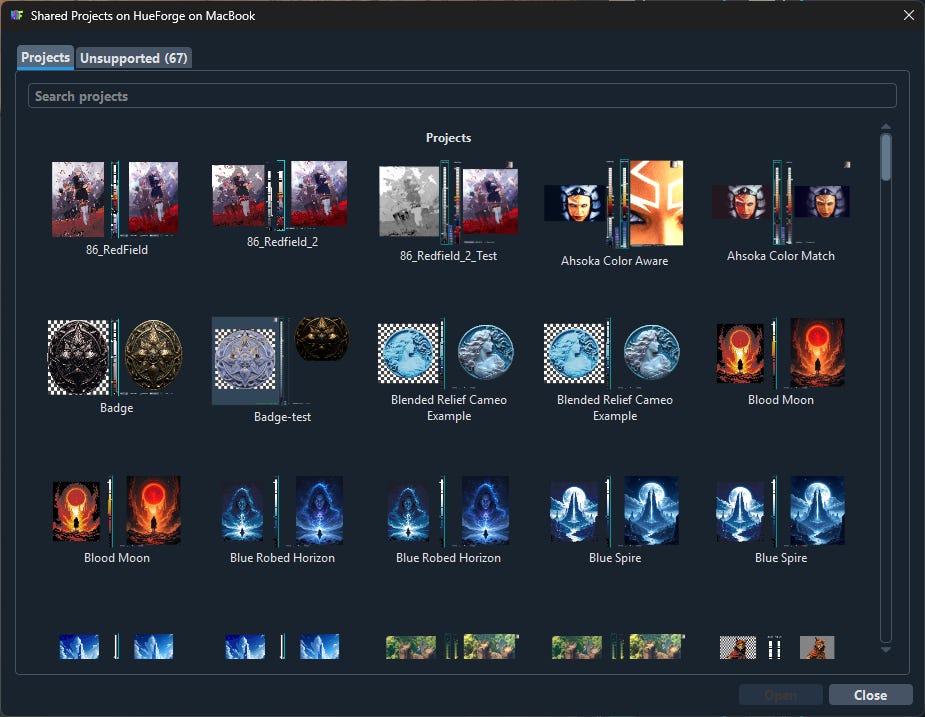
Unsupported projects would be caused by missing plugins or from newer versions with unsupported features.
This has been an incredible quality-of-life upgrade for my work that I’m kind of upset I didn’t make it earlier. I am working on a standalone open-source server that you can run to make a system’s Browse Projects and Filament Library available even when HueForge isn’t running, but it’s not ready yet. I’ll post something when it becomes ready.
There are also huge number of bug-fixes and smaller feature updates in this release, you can see the rest below in the full release notes.
FlatForge and HugeForge
The big changes here are that FlatForge has a higher quality reconstruction with no voids at all available, but it is slower to create the models so it doesn’t run by default. You will need to check the box to recreate the High Quality mesh if you want it.
HugeForge has several fixes for bugs that have come up including missing or duplicated model files and Spike Removal in Standard mode causing uneven tiles.
They are also both ColorDrop 2.0 ready and will work with ColorDrop 2.0.0 the moment it is released.
ColorDrop 1.1.2
I know what you WANT is ColorDrop 2.0.0 but there were a few really annoying bugs in Color Drop that really needed to be fixed now. First, if you didn’t actually drop anything and you passed the results on to FlatForge, it would never send any models and you would get an empty folder with no warning or explanation.
Second, the way you dropped the columns could change the result even when the final stacks looked the same, also once you dropped a stack, it wasn’t possible to grab another valid location from the dropped column. Now you can drop a valid anchor from anywhere.
I know this is minor, but it’s affecting people today and I wanted to get it sorted out before the big update (which is on pace to be out by the end of October).
Here are the details release notes for all of it.
HueForge 0.9.4.4 — Release Notes
HueForge 0.9.4.4, plus new versions of ColorDrop, HugeForge and FlatForge.
0.9.4.4 is our biggest update since the 0.9.4 line began. The headline is Match Fix and Layer Fix, two new tools for correcting a color match pixel by pixel, along with Sync with HueForge iPad, project-aware filaments, a much more robust GPU pipeline, and a ground-up rework of how HugeForge builds tiles. Three plugins ship alongside it: ColorDrop 1.1.2, HugeForge 1.2.0 and FlatForge 1.2.0.
The sections below are split so you can jump to what you use: HueForge first, then each plugin on its own.
HueForge 0.9.4.4
New: Match Fix
Color Match is great until one area lands on the wrong layer. Match Fix lets you fix that area directly, without touching your core. Much easier to operate than SpotFix (though you do have to do one layer at a time) image operations are much easier to handle cleanly with large areas shifted together.
Move pixels from one layer to another. Pick a layer to take pixels from, a layer to move them to, select the pixels, and apply. Fixes are saved with your project, apply is exactly one undo step, and a fix can be switched on, switched off or deleted from a list at any time.
Three ways to select. Island toggles a connected region with one click. Lasso adds a loop, and Lasso − removes one (Shift adds, Alt subtracts). Selections accumulate until you cancel them. Dragging a lasso past the edge of the image captures the edge pixels instead of cutting a corner.
Select by color, not position. The Colors tab plots the matched colors on a scatter chart (Lab, RGB or HSV; choose the axes; amplify the view up to 5×). Lasso a cloud of points and every pixel in the image with those colors is selected, including regions that are nowhere near each other. This is an advanced operation but can be a lot faster than chasing a bunch of pixels across the image if the problem is color based.
Select All, Clear All, and real selection undo. Ctrl+A and Ctrl+D select and clear. While Match Fix is open, Ctrl+Z and Ctrl+Y step through your individual selections; after you Apply, they go back to normal app undo.
A layer rail inside the dialog. Click a layer to pick it. Hovering previews that layer on the image. Drag the F/T badges to change roles. Layers that can’t be picked wear an X with a tooltip that says why.
A fix can land on an empty or disabled layer. A layer you disabled on the Mesh Core is still printed — disabling only tells the matcher not to pick it — so it is a valid To destination - you can use this to have two of the same color at different layers in the print. A layer with no pixels can’t be a selected to pull pixels From, so the rail puts the X back on those boxes whenever From is armed or being dragged.
Fixes follow your layers. If you change the base layers or the layer height, your fixes keep pointing at the same colors. If you swap, crop or rotate the source image, you’re warned and can review each fix.
Easy to reach. Open it from the Tools menu, the Match Fix button on the image, or by right-clicking a Mesh Core layer box (”Match Fix layer N…”, which preselects that layer). The button shows whether it’s usable right now, with a tooltip explaining why not.
Learn it in two minutes. A nine-step guided tour starts the first time you open the dialog, resumes where you left off, and can be replayed from the ? button. There’s also a full Match Fix Guide in the Help menu.
Carried into HugeForge tiles. Match Fix corrections now travel into each tile of a HugeForge export (see the HugeForge section). (SpotFix still doesn’t carry into HugeForge tiles)
New: Layer Fix
Layer Fix is Match Fix for the Color Core. Pick pixels on one Color Core layer and move them to another, with the same Island, Lasso, Lasso −, Select All and selection-undo tools you already know from Match Fix.
Available for the non-Color-Aware luminance methods. Open it from Tools → Layer Fix…, the on-image button, or a Color Core layer-box right-click.
Layer numbers match the core’s own labels. Destinations can include empty layers (”Layer N — 0 px”) but not Transparent or Base Thickness layers.
Corrections are saved with the project, support undo and redo, and are applied before SpotFix. Match Fix and Layer Fix each keep their own dialog and undo history when you switch between them.
Layer Fix corrections are not carried into HugeForge tiled exports, and HugeForge tells you so before it starts.
New: Sync with HueForge on other computers
Send projects and your filament library between HueForge on your desktop and HueForge on your laptop, over your local network. Nothing goes through a server. (As a result, it is ONLY on your local network)
Off by default. Tools → Sync… is where you turn it on. Sync stays off until you turn it on, so HueForge never touches the network for Sync at launch. When you enable it, your operating system will ask you to allow network access — that prompt is expected, and Sync is local-network only. Pair once with a six-digit code and both devices can send to each other.
Two-column dialog. The left side is this computer: turn Sync on, set the name your devices see, manage shared folders, and pair newly discovered devices. The right side is a card for each paired device, with Get Project, Send Project, Browse Projects…, Get Library, Send Library and Forget. Offline devices are greyed out. Each card shows its own progress and errors. This is now the easiest way to share your filament library between systems.
Browse Shared Projects. See the projects another device shares, with thumbnails, and open one directly. Projects your build can’t open appear on an “Unsupported” tab instead of failing later. Add or remove the folders you share right from the dialog.
Projects arrive unsaved. A received project opens in memory, titled “HueForge – name (unsaved, from sender)”. Nothing is written to disk until your first Save, which acts as Save As. The project you had open goes through the usual unsaved-changes prompt first.
Libraries merge or replace. Incoming filament libraries offer Update (merge by filament identity, keeping your extras) or Replace, and a dated backup is kept either way.
Optional Strict IDs. With it on, a paired device that reappears at a new address needs your confirmation before anything is sent to it.
Hardened. Pairing codes are throttled after wrong guesses, oversized or unauthenticated requests are refused, only real image files are ever sent, and names from other devices display as plain text. Discovery was also made reliable on Macs with VPN and other network interfaces.
Projects now keep their own filaments
Project vs. local comparison. If a filament inside a project differs from the one in your library, HueForge now shows both and asks which to use. Tiny TD differences (under 0.1) and metadata-only differences are ignored. A new “On future project loads” row lets you always choose Local or always choose Project.
Reversible, per-session choices. You can pick an alternate version for the open document, see which sliders use one, and only the values you selected are saved.
Provenance labels on filament rows show project vs. local copies, with “local copy” actions in the filament menus.
Safer library saves. Saving the filament library is now transactional, so a failed save can’t leave it half-written. Saving no longer copies community filaments into your personal unowned library, and a previously polluted file is healed on load.
Undo and Redo inside the Filament editor (Ctrl+Z / Ctrl+Y) act on your edits there, not the main window.
Startup recovery. If the library folder is missing, moved or read-only, HueForge now offers Choose Folder, Use Default, Restore Default or Exit — on every platform. On macOS and Linux it previously quit; on Windows a read-only or briefly locked library file no longer blocks startup.
Filament library list behaves. Your search filter stays applied when you toggle Owned or drop a filament on a core, and the scrolled list no longer jumps.
Match Strictness
Right-click a slider on the Mesh Core rail and choose Match Strictness (0–100, where 0 is unbounded). It limits how far off in color a pixel may be and still be claimed by that slider’s band, so off-color pixels go somewhere better. It previews live, is saved with the project, and works with every match method except Dot Product. This is an experimental feature and is likely to change over time or possibly go away, but it can help push a match to the right color if they are close.
More tools and reports
Hue / Lightness Map (Tools menu): a chart of your image’s colors by hue and lightness that shows which distinct colors will collide on the same layers in Standard mode. It recommends Color Match when saturated hues share lightness, or Color Pop when a large grayscale range does, and every element explains itself on hover. The diagram may be a little confusing, but there is a plain text recommendation in the top right to tell you what it’s saying.
Filament Usage Report: scans your saved projects and ranks the Color Core filaments you use most, with brand and TD, an honest statement of coverage, and reviewed batch updates for Favorites and Owned. Open it from the Filaments menu or the Usage… button in the library.
Palette-exact images. Indexed and low-color (256 or fewer) images now stay exactly as you made them: no invented colors from scaling, Pixel Scaling switches on automatically for them, and the preview shows crisp nearest-neighbor pixels. Saved projects keep the exact indexed source.
Rendering, GPU and memory
Color Match no longer crashes or hangs on weaker GPUs. The match is drawn in bounded strips that stay under the Windows GPU time limit, sized to each GPU and remembered between sessions, with identical output. If a GPU still can’t keep up, HueForge offers a one-click Try OpenGL that autosaves and relaunches.
GPU resets recover on their own. After a driver reset, the 3D view, Color Match and Edit Image come back automatically (within 30 seconds) instead of staying dead until you restart, and the 3D view detects the loss immediately rather than showing a white window. This is tested on D3D11, D3D12 and Vulkan.
Fixed a memory creep of roughly 15 MB per Transmission Distance tick, and several full-image copies per color-match pass are gone.
Faster, steadier editing. A color-match pass that was searching 2,000 columns now searches only the real ones (about 13× faster on a fast GPU), autosave no longer re-encodes the full image on the UI thread, and overlapping region-map rebuilds during fast slider sweeps are gone.
Windows 3D view black screen fixed on machines without the Vulkan SDK; the required shader-compiler files now ship in the installer.
Mesh failures are handled gracefully. If a mesh can’t be allocated or a render pipeline can’t be created, HueForge aborts that step cleanly, keeps your corrections, and lets you retry — instead of crashing.
Color and 3D preview fixes
FrontLit blending no longer shows a light/dark sawtooth in a continuous blend once a filament run saturates.
The Layer view slider now spans the Color Core’s own range, shows numbers that equal the core’s labels, and cuts exactly at the layer’s color boundary.
Color Pop “Strict” was reading the red channel twice instead of blue; blue-dominant pixels are no longer treated as gray.
Images from a plugin such as ColorSmith stay put. After applying one, switching modes, luminance methods, Edit Image, Flat Scaling, Full Range, resizing or changing theme no longer brings the original image back, and Combo mode no longer shears the image diagonally.
Pixel Scaling stays off once you turn it off. Only a new low-color image turns it on automatically.
Mouse-wheel zoom on the 2D image centers on the cursor.
Fixed a crash at program exit (plugins are now unloaded cleanly first), and a Match Fix dialog crash when closing it right as the guided tour finished.
Fixed Color Match getting permanently stuck after a tiled HugeForge run.
Saving, loading and exporting
The Overwrite warning is back in Advanced Save, and so is the “Image changed: Overwrite / Save As / Cancel” prompt.
Loading a new image now asks whether to keep your SpotFix adjustments and your Match Fix corrections, both ticked by default.
STL write failures are no longer silent. Disk full, a locked file or similar now reports the file name and reason, truncated files are removed, and batch runs log the failure and exit with code 3.
Opening a built-in Example project no longer makes the install’s Projects folder your remembered save folder. The Browse sidebar shows your last 10 folders.
Project open refuses nonsensical numbers in project files, while newer additive formats still open.
Plugins (host support)
These changes live in HueForge itself, but exist to support plugins.
A plugin that doesn’t match this HueForge is refused with a clear message instead of crashing. Each plugin now declares which HueForge libraries it was built against. Ones that need updating get a “These plugins need an upgrade” dialog with Delete, Check for Update and Keep (Keep is the default, so Enter won’t delete anything).
Plugin install and removal are sturdier. Installs are staged outside the plugins folder, so OneDrive’s read-only folders can no longer defeat cleanup, and a failed folder is removed at the next launch. If you find restarting is unable to remove a plugin, don’t restart so quickly.
Plugin install notices say where a plugin came from: HueForge plugin, third-party from a trusted publisher, notarized by Apple, or unverified.
Tile build API. Plugins can now run tiled builds on an isolated worker with captured settings, masks, borders and a height ceiling, with a defined begin/data/finish lifecycle for exporters. HugeForge uses this to avoid race conditions on slower computers causing missed or duplicate tiles.
Installer and platforms
Windows DLLs and plugins carry version information, so crash logs no longer say “no version info”.
macOS: relocated sandbox paths are recognized, so fewer folder-permission prompts; plugin bundles are packaged with their signatures preserved; and the TD1 installer signs with our Developer ID.
TD1 reflash warning text rewritten to make clear when reflashing risks the cached license file and when it’s safe.
ColorDrop 1.1.2
ColorDrop 1.1.2 fixes several stacking and export problems since 1.1.0. (Version 1.1.1 went only to testers, so its fixes are included here.)
Flatten and Flat Fill with no nests now produce files. Without any repeated-color drop applied, they used to write no STLs and give no warning. Files are now produced, and a failed export step shows a warning and keeps the dialog open.
Works on HugeForge tiles. ColorDrop nests a tile using that tile’s own captured settings (color swaps, border, detail) instead of the parent project’s live values, and refuses clearly if the captured data is incomplete.
Chained nests keep the right height in FlatForge and Flat Fill. When one dropped color was nested inside another, the inner one was placed at its original height in the data handed to FlatForge. Chained and three-deep nests are now correct everywhere.
Drag a repeated color out of any column. In the stacking widget you can now drag from a nest column, not just the base column, onto a lower layer of the same color, for both star-style and chained nests.
Auto-Suggest lets you choose which repeated color to anchor on. With two or more repeating colors, a picker opens. “Automatic (best combination)” behaves as before. Choosing a color forces nesting on it, including interleaved colors the automatic pass skips. If nothing can be dropped, the message says why.
Previews show a chained nest in its real color. It used to be drawn at the parent’s original height and appeared black.
Requires HueForge 0.9.4.4.
HugeForge 1.2.0
HugeForge’s tile pipeline was rebuilt around an isolated worker. Larger photos at finer detail now export, borders and plugin pieces behave per tile, and your corrections come along.
Tiles are built by a background worker from inputs captured up front. Results are deterministic, each tile reports completion, and the progress row shows a thumbnail of the tile being built.
Memory is checked and allocation failures give a readable refusal, and an oversized or invalid mesh is caught before export.
Match Fix corrections carry into each tile of a tiled run, with tiles sampling a halo of surrounding pixels so Spike Removal near tile edges matches the full image. (Layer Fix corrections are not carried, and HugeForge says so first.)
Borders go on the outside of the whole layout only, not between tiles. A border width or depth of 0 simply means no border. Split by Color, ColorDrop nesting and Flat Fill all run per tile, and Flat Fill uses one height for the whole run.
Spike Removal keeps your peaks. CPU Spike Removal now preserves the original section ceilings when exporting tiles instead of lowering them.
STL write failures are reported, and truncated files are removed.
Groundwork for the upcoming ColorDrop 2.0. HugeForge can already build tiles from a ColorDrop mode’s own per-tile output, so tiled export is ready when ColorDrop 2.0 arrives.
Requires HueForge 0.9.4.4.
FlatForge 1.2.0
FlatForge gains an optional, much smoother meshing path and works cleanly with tiles.
New: High Quality meshing. Available in the Mesh Viewer and Flatten options and labeled “Slower to generate.” It rebuilds walls and surfaces from the original-height terrain, so wall profiles are smooth, narrow ridges are fit with straight diagonals, and shared boundaries between layers match exactly. Flat roofs, bottoms and transparent cap tops are grouped for far fewer triangles (for example about 477,000 fewer on one color export), and meshes are checked to be watertight before export.
Large builds complete. For example, 350 mm at 0.2 mm in about 17 seconds. Progress is reported in measured stages, and it stays within the job’s memory budget, falling back automatically if an optional optimization would exceed it.
High Quality starts off to avoid long waits to view your model when you launch the dialog.
Works under HugeForge tile runs, with a consistent height across tiles.
STL write failures are reported, and truncated files are removed.
Groundwork for the upcoming ColorDrop 2.0. The dialog already understands a ColorDrop mode’s layered stack, and merges same-filament layers into one mesh per filament head, so FlatForge is ready when ColorDrop 2.0 arrives.
Requires HueForge 0.9.4.4.